Click HERE to return to the contents page
I. Getting started [Time: 52:02 min.]
https://websmp103.sap-ag.de/~sapidp/011000358700000345472011E/index.htm
Total Time presentation 13:17:29
We will view a customer record to explain the concept of Master Data.
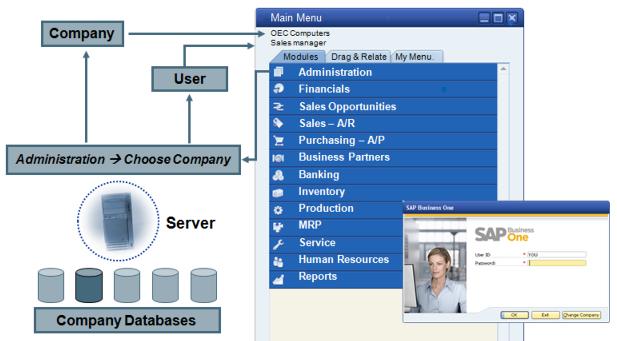
In SAP Business One, a company is represented as database.
When you log into SAP Business One, you choose the company to log into.
Why would a small business have more than one company? Perhaps the company has two legal entities within their business, a situation that requires maintaining separate databases.
Beside specifying the company, you enter a user and a password to log in. Once you log in, the main menu opens.
The menu arranges the functions of the individual applications in a tree structure. The company name and the name of the current user display on the top left.
If you need to change companies while logged in, you can use the Choose Company transactions in the Administration menu.
The next time you log in, you will be directed to same company database. If you wish to log in into different one, choose Change Company in the login window.

The SAP Business One menu bar displays at the top of the screen.
The menu bar contains the windows standard menu (File, Edit, Window, Help) as well as generic SAP Business One functions.
The toolbar displays under the menu bar. The toolbar is a collection of icon buttons that grant you easy access to commonly-used functions. The functions represented by the buttons are also available in the menu bar.
Active functions appear in color, and inactive functions gray out.
You can choose the toolbars that will be displayed or hidden. To hidden or show a toolbar, right-click in the toolbar area and check or uncheck the appropriate toolbar.

You can use SAP Business One online help in several ways.
If you press F1, you get context-sensitive help; that is, help about the particular screen you are on. Use Shift + F1 to get a field context help.
The System Messages Log displays up to the last 50 system messages that appeared on the application window for the current user since the last login.
The window displays errors, warnings or information messages.
This pane appears at the button part of SAP Business
application, but you close it, move it, and resize it as required, like any
other application window.
Menu Bar: Window > System Message Log
Ctrl + 1
A hyperlink to relevant help files may appear in the row.
Click on it to read more detailed information about the message.
??? When available,
the system message will display an eight or nine digit unique identifier. You
can use this ID as a search key in the online help. The date and time of the
message appears.
You can change the format file on the date and time in the
General Settings area, under:
Administration > System Initialization > General Settings
> Display tab > Date Format and Time Format fields.

There are two types of users: super users and normal user (or end) users. End users are restricted to certain actions and menu items due to authorizations.
Therefore, end users typically see a subset of the main menu tailored to their role.
Superusers have acces to everything, therefore, they typically view the full menu.
All users can further customize the menu to show the modules and menu options they need.
Personalizing the main menu can be done the Form Settings window. Ctrl + Shift + S
In Form Settings, the "Visible" checkbox controls whether a module or menu items appears. If this box is checked, the menu item displays on the main menu. If this box is cleared, the menu item will not display.
An end user can select the Apply Authorization button to set the main menu to display only authorized modules and menu items. This makes using the system much more efficient and avoids frustration.
The form Settings window is also available for other windows. For example, you can show or hide columns in a document using Form Settings.
Personalize windows and settings
Two more options for personalization are found in the Tools menu.
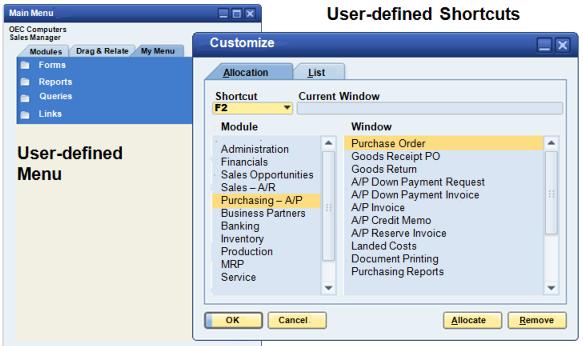
You can set up a user-defined menu with you favorite transactions and frequently used queries in the My menu transactions.
Four folders are pre-built for you: Forms, Reports, queries and Links. However, you can add new folders, rename folders, and organize the entries in the way that makes the most sense to you.
A second option is found under
Tools > My shortcuts > Customize
You can assign function keys to your most frequently used
transactions. You can then start these transactions simply by hitting the
respective function key.
We will explore how to log on, navigate and set personal settings in SAP Business One.
In the Window Welcome to SAP Business One I enter my User code and Password.
I am directed to the company database I used last time. When I first log in, I come to the welcome window. This window will gives us many options for resources to learn about the system. You can choose whether to show this page at start up.
At the bottom of the screen, I see the System Message log.
Window > Message log
This pane shows me message for this login session. I can choose to show Errors,
Warnings of Information. I cans set the maximum number of message would like
to display [50].
On the left side of the screen, we see a tab for the modules of SAP Business One. This is your main control panel for the different function within SAP Business One.
Click on any module, and it will open to see the options below. You can drill down and open windows.
The option Administration > Choose Company will list all the companies on the server.
You can also choose to log in as a different user within the same company. This can be useful if employees is a small company, share computers.
You company and user name will appear in the top left of the Main Menu. Ctrl + 0
Along the top of the screen, you see the menu bar and the tool bar. You can see which options are active in the tool bar and menu bar. Available options appear and unavailable options will be grayed out.
Open Business Partners > Business Partner Master Data.
Every option available by icon is available in the menu bar at the top. I choose Data > First Data Record.
There are two types of help available in every window: screen level help and field level help.
To reach screen level help, I can press F1 and a window appears with help.
For field level help, right click on a field and choose "What's this?"
Another way to acces field level is to use Shift + F1.
When a company database is first created, you set the basic customization for that company in the Administration menu.
Although we will skip most of the details for setting up the system at this point, we will take a quick look how you can set display parameters for how language, dates, and other fields appear throughout the company.
To make these settings, I choose
Administration > System Initialization >
General Settings.
Then I go to the Display tab.
First I will choose a language to be used for the company. Then I will choose a date format for the company.
I can go to the Font & Background tab, to change fonts and background images.
When I finish, I choose Update to save my settings.
Note that some settings in this window are made for the individual users who made the change, and some are companywide.
Now we will take a quick look at users and how you can assign authorization for transactions.
Users are defined in the Administration menu under General
Setup.
Administration > Setup > General > Users. Choose
last data record. I can scroll through the users.
Most users are end users, but some users are defined as super users. A super user has access to all transactions, but end users have authorization defined. When a new user is defined, you need to decide whether the user is a super user or not. Then you need to give the user a user code which is the unique ID for that user. As you can see, the user code cannot be modified after it is created.
Other information can be defined for the users. One useful field is the Defaults. Choose a default, the choose the link arrow for the definition. In the defaults I can define certain information that overrides company defaults, for example, address and location, color of the application, the default warehouse, the default tax code, print preferences and credit card information.
Authorization are set in the menu:
Administration > System Initialization > Authorization >
General Authorization. Authorizations can be at the level of the module
or at a lower level.
Once authorization are assigned to one user, those settings can be copied to other users. Click on one user and drag that user on top of other user to get message "Copy authorizations from X to Y?"
On the main menu I can set transactions for which the user has no authorizations to be suppressed automatically.
I choose Form Settings. Notice the button Apply Authorizations. [Appear all menus]
Users can also personalize their menus to make their daily functions easier.
One way to do this is to use the My Menu option.
On the third tab main menu I can organize my forms, reports, queries and any additional links by my own preferences.
I would like to add the Sales Order to My Menu.
Sales - A/R > Sales Order. While I have the Sales Order menu open, I can go to
Tools > My Menu > Add to my menu to add it to the folder of my choice. I can
give it a name and choose Add. Now when I open my menu, I can easily open the
window quickly without having to navigate the main menu on the Modules tab.
Another personalization I can make is to assign my most
frequently used transactions to function keys so that I can access them quickly
than using the menu. I can assign transaction to function keys F2 through F12.
The F1 key is reserved for accessing online help. I choose:
Tools > My Shortcuts > Customize. Since I know that the transactions for Sales
Orders an Purchase Orders are the transactions that I will use most often, I
will assign these transactions to the functions keys F2 and F3. I choose Module
Sales - A/R, window Sales Order and button Allocate.

Beginning with patch 12 for version 8.8, you can activate personalized cockpits for users. The cockpit enables easy navigate for a user's frequently used transactions.
Users can choose their favorite widgets and position them where they like. widgets are available for open documents, common transactions, messages and alerts. There are also browser widgets for displaying URLs.

There is a 3 step process to setting up a cockpit for a user:
1. you need to enable the cockpit for you company in the General Settings
transaction: Administration > System Initialization > General Settings: Cockpit
tab. Then once the cockpit is enabled for the company, a user can choose the
menu item "Enable my Cockpit" in the Cockpit menu under Tools. Lastly, the user
choose which widgets they would like to use from the widget gallery.
Note that Dashboards require additional integration through the use of the B1i integration platform.
I will show you another way to personalize the user interface, this time using a cockpit. The first thing you notice when you open cockpit is that the menus are a little bit different. On the left you have not only the regular tabs for the SAP Business One menu and the Drag and Relate menu, but you also have a menu for Cockpit functions.
There are 3 pre-designed cockpits available, but the users can also build their own quite easily using the pre-built widgets from the widget gallery.
You can hide these menus by choosing the triangle in the upper left corner of the menu. Then you can reopen any of the menus by choosing them by name.
The windows in the cockpit can be rearranged and resized as needed by the user.
Let us take a look at each type of prebuilt widget in different cockpits. Here is a layout set up for sales. Here's a cockpit dashboard which show reports from Crystal Reports.
First, in the upper left we have a browser window. If you choose Settings, you can change which URL is show in the browser.
The common function widget allows you to collect the transactions you use on a daily basis.
The open documents widget gives me a quick glace at how many open transactions there are by category. The number in the brackets is the number of open documents for this type. If you clic on one of the document types, you get the open documents report for that type of document.
If you choose Settings on the open documents widget, you can select which document types you would like included in the window.
If you are using Messages and alerts, it's a good idea to add the Message and Alerts widget.
In the upper right, there is a search box. You can type a text string and the system will display relevant functions that match the next string. For example, type "data" then choose Business Partner Master Data from the list to open window.
Now we will take a look at how you enable the Cockpit. It is
basically a three step process:
1. you enable the cockpit functionality for a company:
Administration > System Initialization > General Settings: Cockpit tab. after
you choose OK, you will need to log in again for the settings to take effect.
2. The second step is for users to enable their own cockpits if they choose to. This is done from the Tools menu. Choose Cockpit and then Enable my Cockpit. Once again, the user will need to log in again to see the change.
3. The third step is for user to either choose a pre-made cockpit or to design their own. either way, users can personalize the windows as we saw ti store information they need on a daily basis.
You will also need to make sure the users have appropriate
authorization to use the widgets:
Administration > System Initialization > Authorization > General Authorization.
You can authorize someone for full cockpit authorizations or pick and choose the
appropriate authorizations at the level of each widget and dashboard.
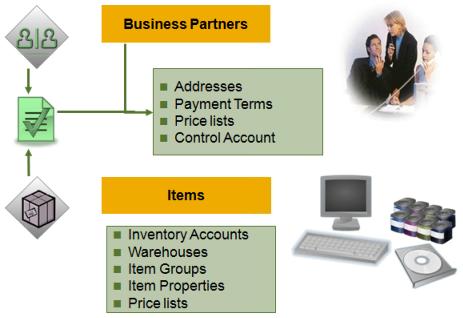
SAP Business One tracks business activities using documents such as Purchase Orders, Invoices, Production Orders, Sales Orders, and so on. Each of these documents is constructed from smaller reusable chunks of data called Master Data.
Master Data refers to the key information that describes your Customers, Vendors, and Leads as well as items that your company buys and sells.
Creating documents from Master Data increases productivity, ensure data consistency, and reduces errors.
It is easy to look up business partener and item information while you are entering sales and purchasing documents.
A selection list icon is available in the Business Partner and item number fields in marketing documents. Use the selection list icon to make a selection list appear. You can scroll through the list or use characters with wildcards to search.
To open a lead, customer or Vendor Master record, I choose the
menu path:
Business Partners > Business Partner Master Data. When I first open the Business
Partner Master Data record, I am in find mode which means I can Search for
existing records.
I have a icon to change to the Add mode. This allows me to switch from finding records to adding a new record to the Business Partner Master Data. If I choose it, the window me add new info. And now the Add icon is no longer available and the Find is now active. If I want to search for existing records, I can choose the Find icon. Every field that is available for me to choose is a search field. This means I can search by code, by name, by group, by phone number and so on.
I would like to see all the customers whose Customer Codes begin with "C*". For example if I choose "C2*", I will get a narrowed down list that includes only the Customer Codes that begin with C and a 2.
I can focus my results by providing more information for the search. The list can be customized to by criteria of your choice.
When I am in the list, I can choose the Form Settings icon to customize the list by user. I can make changes to sort the list in useful way for me, such as by bill-to city. I can always use the button to restore the default. After I make changes, I close the window. Then when I next search, I will see the list grouped by the criteria I set.
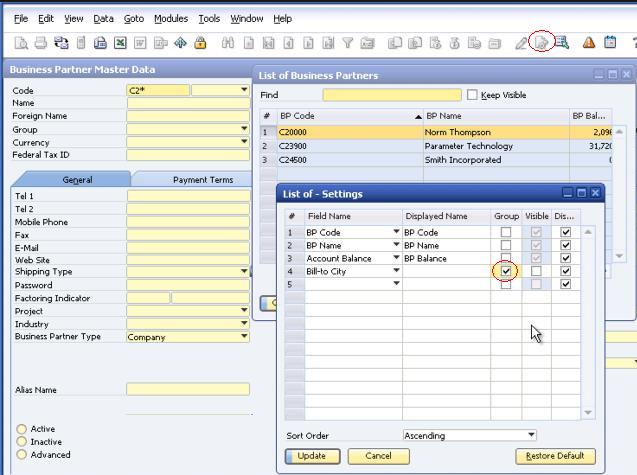
The settings I made for Business Partner searches will apply not only here in the Business Partner Master record window, but in any window where I can search for Business Partners. so, for example, when I open a Sales Order, I get the same settings.
When I open Form Settings for my Sales Order, I choose Table format to get a list of all the fields currently visible. I can add additional fields and make them visible or remove fields I am not using.
If I would like to make this change for and additional user, I can copy these changes, using the user setup window, and the Copy Form settings button.
Notice that our Sales Order opened automatically in Add mode. Master Data opens in Find mode, but marketing documents opens in Add mode. Configuration data, such as Warehouse Setup, also open in Add mode.
In Business Partner Master Data: some of the information that appear in the Master Data comes from configuration. For example, Payment terms are defined in advance of settings up customers. Choose Payment terms tab. If I choose the link arrow to the left of the Payment Terms field, I can go to the window for customizing Payment Terms.
Some fields with a dropdown menu such as the Payment Terms, will let authorized users define new options if there are none appropriate. This type of direct configuration is typical in SAP Business One. Use the dropdown menu, choose Define New.
Notice how using Define New, takes us to the same window where we saw the details on the previous Payment Terms, but now we can define a new one.
We have some additional personalization options for fields labels in windows. You can personalize the filed labels in your windows.
I will choose Control an then double-click on the field Name to open up a window which allows me to give it a new label. Change to customer Name. This change is for all users, therefore the ability to change field name is controlled by authorizations. To change it back to its original, I can control and double-click again, and choose Restore Default. Now the name is back to the original.
Common Data Structure for Marketing documents

All the documents in Purchasing and Sales share a similar structure.
The documents for Sales and Purchasing are also often called "Marketing Documents".
In general the document is divided into 3 parts:
- the upper part (header) with the general information,
- the middle part with the information on different tab pages and item specific
data, and
- the lower part (footer) with more general information.
The middle parts contains 3 tabs:
- the Contents tab is where all the specific information about the ordered items
or services is entered, such as quantity, price, item number, and description.
You can access more item specific data in the line details by double-clicking a
row.
- the specific Logistic tab contains the details bout where the items or
services and payments are to be sent. shipping method is also specified here.
- the Accounting tab contains the relevant General Ledger (G/L) account
information for the purchase pulled from the financial accounting Master Data.
Much of the data appearing in these tabs default from the Master Data.
The values can be changed while working in the documents. These changes will affect the document, but do not change the Master Data records.
Row Type in Sales and Purchasing Documents
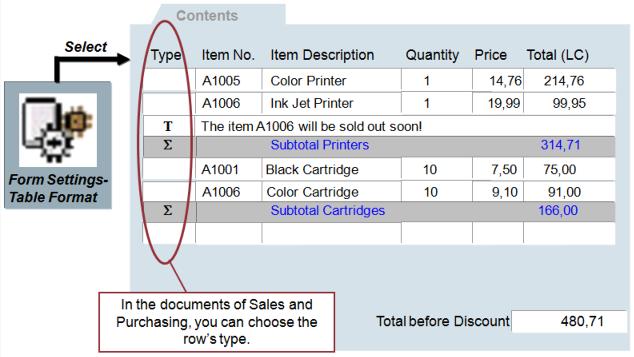
In purchasing and sales documents, you can choose the row's type on the Contents tab page.
The default view of the system is without the type column and can be edited using Form Settings. You have ti select the Type indicator on the Form Settings - Table Format tab page.
The options for the row type are:
- Blank: for a regular item row this fields type is empty
- T: for text row
- Σ: for subtotal row
- A: If the document is a Sales Quotation, the option A is available for an
alternative item row. An alternative item is not taken into account on sum
calculations. When the document is copied to a target document, a user can
decide if the alternative item should remain or be deleted.
You can change the format of any row in the Contents tab of any SAP Business One purchasing document to insert text or a subtotal of the preceding row. Simply clic on the drop-down list in the Type field and select T (for text) or Σ (for subtotal). When you select T, the Text editor pop-up window appears. Frm here, insert predefined text from the drop-down list or insert you own text. This is especially helpful when you want to convey specific instructions to your vendor about how items should be manufactured, handled, or shipped.
We will use a Sales Quotation as our example for marketing documents since the structure for Marketing documents are all the same.
Sales > Sales Quotation. In top we choose a Business Partner and set relevant dates.
In the middle, on the Content tab, we choose items, quantity and set pricing. On the Logistics tab, we see address information such as ship to and bill to. and we see Payment Terms and additional accounting information on the Accounting tab.
On the footer area, we would see associated employee such as the Sales Employee, and Remarks, and totals for the document.
If we want to search for an existing quotation we can switch to find mode and, for example, enter the number of the quotation we are looking for, and then press Enter. Here is the Sales Quotation 248. We could also search for a document by customer Name or other related fields. So, if I enter the beginning of a customer name with an asterisk *, I would get a list of all existing quotations for all customer.
I will choose Add mode to enter a new Sales quotation. I will enter A* in the customer Name field and choose Tab to find all customers beginning with A. another option for searching is to use the selection list for customers.
I can sort by double clicking and then enter the beginning value of the sorted column.
Once I select my customer, additional information from the customer master is automatically populated. I see the Name, the Default contact person.
The system also automatically numbers the document with the next document number for the document series.
Now I can go to the table area and start choosing items. If I press tab, I get a list all sales items. If I were in a purchasing document, I would see items set as purchasing items. I can choose one or more items by using the Shift or Control keys. Use Shift to pick the first three items, then control click for another item.
Now we see pricing information such as the unit price, any discounts, and the total for each row.
I can customize this table using the Form Settings. I can uncheck fields such as discount percentage that I do not want in the document and I can add fields such as Warehouse that would like to see.
Sometimes you want to view additional information in the document, but you do not want Add the field with Form Settings.
If you double-click on row number, a window appears with additional information.
I can to change to the Description of the item. When I try to tab the next field, I will get an empty list of items because this item does not exists in the system, but since I want this Description changed, I will use Ctrl + Tab to move to the next field, without affecting the Item Master Data.
I can do the same changed on the Customer or Vendor Name field, for a one time change, without affecting the Master Data.
From the price Total field, I have the option to open the Last Prices report. I can right click on the field, and choose Last Prices. The Lst Prices report shows me previous prices used for hat item with this Business Partner. I can filter list to choose which type of document I would to include. I can also uncheck the Business Partner code to see the price for buying or selling this item with other Business Partners. The I hit refresh to see the prices for other customers.
If I want to see prices from the purchasing side, I can choose vendors and choose Refresh. Now I see purchase prices for his item.
I choose one of the prices here, it will be copied over to the document itself.
I can use the tool bar to see additional information such as Gross Profit and Weight and Volume Calculation.
When I right click on the row, I see a context menu allowing me to perform different operations. For example, I can Delete a row, or I can Add a row. I can also duplicate a row and it will be added below the row I choose.
By right-clicking the item code filed, I can choose to see a list of Alternative items for selected item.
By right-clicking the warehouse field, I can open a warehouse balance quantities report to view available inventory in all my warehouses for the selected items.
By right-clicking the quantity field, I can open the available to promise report, or sever others options. An I create or select Serial Numbers, or batch numbers for the eligible items.
If I go to volume and weight calculation, I can see the total volume and weight for the items in the document. I can also see the percentage that row is for the total document.
On the Logistic tab, I see the ship to and bill to information.
On the Accounting tab, I can see the default Payment Terms. The fields on these tabs come from the Business Partner Master Data.
However, I can still override it to choose for example different Payment Terms.
I can choose the Last Data Record icon to open the quotation I just created.
Since the quotation is open, I can continue to make changes to the document. I can change quantities, Add Rows, delete rows, change prices and so on. After the quotation is closed, I will be able to make limited changes. I will give the customer a 5% discount on the total order.
Tools > Change log to see the change in my document. If I choose Show Differences, I will see the differences between the old value and the new value for each field.
Click right in header or footer for Duplicate a document. A new document opens with a new document number. The items come across, but the Business Partner fields is blank. I can choose a different customer from the list. If I want to make changes I can make changes.
Now let us take a look at row types.
I can add the field for row types by using Form Settings. An unmarked row is as
normal row. I can add a subtotal row after first three items. I add a row, the
choose the option Subtotal from the dropdown. Now we see the subtotal for the
first three items. If I add a subtotal below all the items, it will only
subtotal the two rows above it - those rows that are below the previous
subtotal.
Another row type is a text row. I have a option to add free text or a predefined text. I can change the text by double-clicking on the row to make changes.
The last type of rows is an alternative row. This type of row is only available with Sales Quotations. I choose alternative and choose from the list of items. Notice that this item has a price. This row offers an alternative option to the other items in the order.
I can use the filed summary type in the top right corner, to summarize my rows. I choose Summary by Item.
If I am not ready to add the document, I can save it as a draft. File > Save as Draft.

Drag & Relate is a particularly effective means of linking two business objects to create a query.
The screen on the right shows the data in an item master record.
If you want to find out which quotation have been made for this item, for example, you simply drag the Item Number field to the quotation entry in the navigation Drag & Relate tree. The system then displays a list of all the quotations for the item.
If the list is too long, you can filter the list to display just the results that you are interested.
You can limit the authorizations per user for using the
reports, by choosing the menu path:
Administration > System Initialization > Authorizations > General
Authorizations: Drag & Relate.
The last tab in the main menu is Drag & Relate. Drag & Relate allows me to quickly create reports and filter them on demand. This menu is organized by modules.
I can open a module Sales A/R and acces documents in that module. I start with Sales Order, I get a list of all the Sales Orders in the system. I can filter to show only open documents.
I click on "open" drag it up to the Filter icon on the toolbar. Then I will filter by open document only. Click on filter button in filter tab window. Now I see only open documents.
I can also drag values to narrow down the list. For example I would only like to see Sales Orders from this customer so I will drag the Customer Code to the Sales Order entry Drag & Relate. Now I see a window with only Sales Orders for that Customer.
If I would like to see the details of what this Customer Ordered, I can take the Code and put it on the Sales Order Details entry.
I can take the item to see who else purchased this item from me.
I can take the item number an put it on A/R Invoices, for example, and I will get a list of invoices that include this item.
I can drill into a particular document using the link arrow. I can take information from this invoice to open another report with Drag & Relate such as taking this item, and dragging it over to Returns to see documents where this item has been returned.
I can use the menu option Window > Cascade to see all the windows currently open. Or use windows close all, to Close All open windows in one click.